25+ Easy Christmas Nail Art Designs To Try Yourself
Hello, lovelies! Today I’ll be sharing some Christmas nail art designs you can try yourself.
I love painting my own nails and doing different designs. I’m also not that good at it; so don’t worry, all the nail designs in this list are super easy to recreate at home.
Easy Christmas nail art designs you can try yourself! Share on X
*SOME OF THE LINKS IN THIS POST CONTAINS AFFILIATE LINKS AND I WILL RECEIVE A SMALL COMMISSION IF YOU MAKE A PURCHASE AFTER CLICKING ON MY LINK*
1. Gold And Red Christmas Tree
How cute is that Christmas tree? What I love about this design is that you only have to work on one nail.
This tree is pretty easy to make. Just get some tape and make the form of the tree.
The start at the top can be a little tricky to make, but you can always put a sticker to replace it.
Nail Polish You Need: Dorothy’s Stilettos, Mirage, and Emerald Memories.
For the white nail polish, I recommend the Sally Hansen Color Therapy Well, Well, Well. For me, is the best white nail polish I have tried in years. I love the formula and it lasts long on your nail!

2. Santa Claus Hat
Again, you just have to do the design in one nail. That’s honestly the best! I’m right-handed, and I struggle a lot when I have to use my left hand to do the design.
The hat shape in very easy to make, you just need to add the white parts; and in a few steps, you have your Santa Claus hats ready.
Like I mention in the previous Christmas nail art design, you should try the Sally Hansen Color Therapy Well, Well, Well for the white part.
I also recommend the Essie Rock the Runaway because it’s a very bright red and it would look perfect!

3. Christmas Glitter
These nails don’t have any design in particular and it’s something very pretty and easy to recreate.
If you think that drawing forms with nail polish is too hard for you, then this Christmas nail art design is perfect for you. I love the glitter and the neutral color under it.
I tried to find that particular glittery nail polish from China Glaze, but it looks like it’s not available anymore.
A good option to recreate this design is to get two different glittery nail polish. Or you can get this nail polish from Etsy, that’s very similar to the one from China Glaze. Here’s another option.
For the base, you can use Rainwear Don’t Care by Essie. It has a similar look to the one used in this picture.

4. Gold, Red, And Polka Dots
This design is super cute and very easy to recreate. You just will need a tool that will help you to make the dots.
If you don’t have at home a nail dotting pen (this set is only $3.80, and in my opinion, is worth to have it), you can use the end of a paintbrush.
For this design, you can use Sally Hansen Well, Well, Well; China Glaze China Rouge for the red tone; and Up Front & Personal by OPI for the golden glitter.

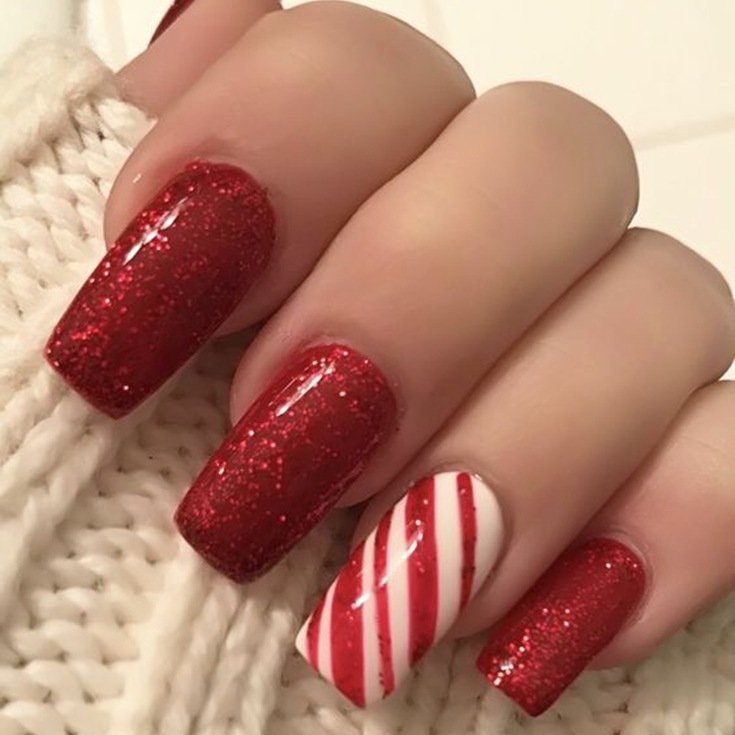
5. Candy Cane
I’m not a big fan of candy cane, but these nails are super fun to make! You just need to make a few lines and you are done. Perfect for the season, and even better if your nails are long.
For this easy Christmas nail art design I would recommend Sally Hansen Well, Well, Well; and A Little Guilt Under The Kilt from OPI.
6. Minimalist Tree
This is a very creative and minimalist nail art design. I love how simple it is! Just add a start sticker and you are done. Super pretty!
To recreate this design, I would recommend a bright red tone, like the OPI Red Hot Rio; and for the gold Christmas Tree, you can use Up Front & Personal by OPI

7. Last Minute Christmas Nails
This has to be one of my favorites Christmas nail art design from the list. It’s simple and easy to recreate.
I love the colors and the glitter is so pretty! Even though that glitter nail polish (Bring on the Bling by OPI) is not available anymore, I found a similar one that would look perfect on your nails!
For the red nails, use OPI Red Hot Rio; for the green nail polish, you can use OPI Stay Off the Lawn!; and for the glitter part, you can use this nail polish I found on Etsy, super similar to Bring on the Bling!

8. Christmas Wrapping Paper
I’m obsessed with this Christmas nail art design. It looks harder to recreate than the others; but I’m sure that with the right tools, you can make it work.
I might not include the fox to make it easier. I just love how the white, the two different gold tones and black look together!
To make this Christmas nail art design at home, I recommend using Well, Well, Well by Sally Hansen for the white base. For the gold parts, you can use Mirage by Ella + Mila and Million Mile Hues by Essie; and for the black, you can use OPI Black Onyx.

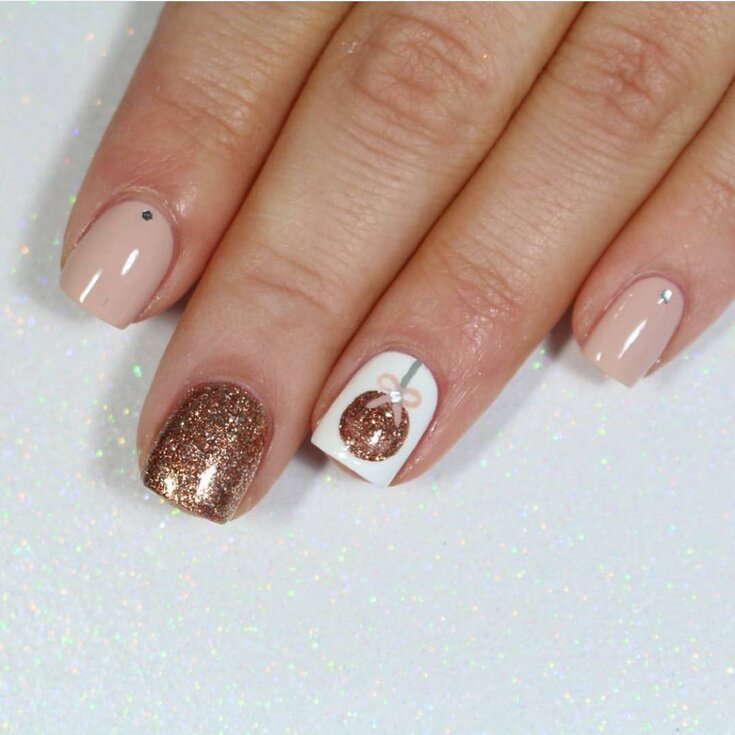
9. Christmas Tree + Ornament
Even though the details can get a little tricky, the ornament and Christmas tree aren’t that hard if you have the perfect tools to make them.
The colors you can use for this design are Bogotá Blackberry by OPI; Well, Well, Well by Sally Hansen; and Sinful Colors, Queen of Beauty (currently $2 on Walmart!)

10. Glittery Santa
Of course, Santa Claus needs to be on your nails for the holiday season!
Pinterest has many ideas, but most Santas were too tricky to draw and look way too perfect. But this one looks very easy to make!
For the color red, you can use Essie Rock the Runaway. For the glitters tones, you can use Rock at the Top by Essie and Sparkle On Top by Essie on top of Well, Well, Well by Sally Hansen.

11. Easy Christmas Trees
I love Christmas trees designs because they are super easy to make. You just need tape and then you will have the form you want.
If you want to recreate this design just click the link below the picture for the tutorial.
The colors used in the tutorial aren’t available anymore, so here are some options for you: This Cost Me a Mint by OPI, Stay Off the Lawn! by OPI, and China Glaze’s Holo At Ya Girl!

12. Present Bow
If you like something a little bigger and creative, you can definitely try this out. I love it because is simple but at the same time, everyone will notice your nails. The bow makes a statement.
The nice thing about this tutorial is that you can pick the bow with the colors you want! You can customize it the way you want it.
To recreate this design, just click at the link below the picture to follow the tutorial.
The tutorial doesn’t give you nail polish options, but can use the following: Essie, Style In Excess; Well, Well, Well by Sally Hansen; and OPI, Black Onyx.
If you want to make it look more festive, you can change the purple for a red like Essie, Rock the Runaway

13. Snowman
Even though this tutorial is in French, you can easily see with images with the steps you need to follow.
I love the colors and how cute this snowman is. Perfect for the cold weather!
The moment I saw this design, imagine it with Let Love Sparkle by OPI, it’s the perfect nail polish for this design!

14. Polka Dot Reindeer
I have seen many reindeer on Pinterest, but they look so hard! Others have too many details that I know I won’t be able to make. That’s why I love this one! It looks very simple to recreate.
Colors to use: Essie Rock the Runaway; Well, Well, Well by Sally Hansen; OPI Black Onyx; Essie, Mid-Day Mocha; Zoya, Louis.

15. Christmas Colors
Another easy and bright Christmas nail art design you can try at home. Get your brightest colors and recreate this look!
If you aren’t sure which colors to use, I recommend this China Glaze nail polish for the red nails; this green sparkly nail polish for the green parts; and Well, Well, Well by Sally Hansen

16. White Christmas Tree
This Christmas nail art design is super cute. I usually don’t use blue on my nails but I love how it represents a Christmas Eve night.
Get your tape and star stickers, and get ready this look with the colors: Born to Rule by China Glaze; and Well, Well, Well by Sally Hansen.

17. Minimalist Nails
For this design, you will need gold nail stripping tape, nail stickers, a nude nail polish, and Amore at the Grand Canal by OPI.

18. Christmas Lights
This one looks a little harder. Trying to glue the threads can be a little tricky especially if you are looking for a shape in particular, but once you have that done you can easily draw the Christmas lights.
For the lights, you can use Essie Rock the Runaway and Evergreen by Zoya; and for the background, you can use Well, Well, Well by Sally Hansen.

19. Christmas Polka Dots
Another polka dots nail design. They are easy to make and they look super cute!
Definitely use a nail dotting pen for this design. It will make it so much easier for you.
For this Christmas nail art design you can use Ella + Mila, Mistletoe Magic; Essie, Rock the Runaway; and Getting Groovy by Essie.

20. Mini Christmas Trees
I love this minimalist Christmas trees. They look super easy to make and the final look it’s adorable. Perfect a day to day nail design.
The original colors used in these design are Gelish, My Main Freeze and Gelish, Ice Cold Gold. For the black trees, you can use OPI, Black Onyx.
But you can also use these nail polishes: Rainwear Don’t Care by Essie, and Golden Nuggets by Essie.

21. Glittery Candy Cane
Another fun candy cane nail art design!
To recreate this easy Christmas nail art design you can use these colors: Well, Well, Well by Sally Hansen; China Glaze, Sparkle On; and Zoya, Ivanka.

22. Pink Ornament
To follow the tutorial just click in the link below this image. That video will show you how the ornament is made. That way you won’t be lost trying to recreate this design.
Colors used: Well, Well, Well by Sally Hansen; Made It To the Seventh Hill! by OPI; and Bare With Me by Essie.
You can also get this gems to make it look more professional.
23. Trendy Christmas
How cute are this trendy Christmas nails? I love how the gold and red look together. You can also watch the video to help you make this nail art design.
To recreate this design you will need China Glaze, Sparkle On and Good as Gold by Essie.

24. Gold And White Christmas Tree
I love how simple this Christmas nail art design is, but also with so many details it makes it so pretty!
Make sure to get star stickers for this. You can get these ones from Amazon, they are only $7.
For this nail art design you will need the following colors: Going Steady by Essie; for the silver details use No Place Like Chrome by Essie; for the gold parts use Good As Gold by Essie; and for the white details you can use Pearly White by Essie.

25. Waving Snowman
How cute is this snowman? I love how it looks like snow is falling. The snowman doesnt have a face, but I kinda feel like it’s smiling. Do you think the same?
For the light blue color, you can use Strut Your Stuff by Essie.

26. Sparkly White
I love how simple this design is but what really makes it better is the nail polish Be Golly, Be Jolly by Painted Polish. Also, Painted Polish is definitely a great brand if you are looking for glittery nail polish.
Since Be Golly, Be Jolly is not available anymore, you can use this nail polish from Etsy which is very similar!

27. Gold And Green Christmas Tree
This one Christmas nail design is a little harder to recreate, especially for the details with the tree.
For the tree, you can use this tape, which is the perfect width for this design.
You can use this colors to recreate this design: Honor MatteVelvet by Zoya; Ivanka by Zoya; Good as Gold by Essie; and Rock At The Top by Essie.
Don’t forget about the red star! You can find it on Amazon for only $7.

So tell me, which one of these easy Christmas nail art designs is your favorite? Let me know in the comments!
I will definitely try to recreate #8. Let’s see how that goes!
For more Christmas content, click here.
Sincerely,

I’m a beginner nail student and I am going to try some of these designs. Thank you so much for the pictures, information, and help. I love all your work! I hope to be as good as you one day!!! Ginger Johnson
You are very welcome! Good luck with everything 🙂